


Mocopan Coffee’s Babin Gurung on how to tackle the core latte art basics and techniques that, once achieved, open up a huge window of opportunity to let your imagination run wild.
When I see latte art appear on my ordered coffee, it shows that the barista has put love and care into preparing the drink. Although the focus should always be on flavour, making it visually appealing is also an important part of serving coffee.
There are infinite number of latte art designs that you can pour, but in order to get confident and consistent, it’s necessary to master a few techniques.
Good latte art always begins with well textured milk. Portioning milk correctly is important for consistency and control.
Refer to my BeanScene December 2019 article on How to texture milk and perform the perfect pour to learn more.
I find wide-mouth cups or glasses are easier to pour into.
Once you achieve a latte texture of one centimetre of froth, the fun really begins.
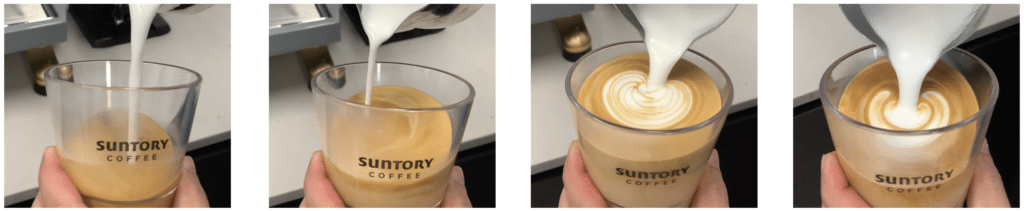
Piercing: This refers to pouring milk from 10 to 15 cm height from the surface of your espresso at a slow and steady pace. This will ensure the milk sinks to the bottom without disrupting the crema. You not only retain maximum colour but flavour in your espresso with this technique.
Blending: As you pour your milk, swirl your jug around the cup to soften and even out the crema, giving you a uniform backdrop to pour your latte art onto. This can also be achieved by moving the jug from side to side. If doing this on a cappuccino, a fine layer or chocolate powder can be added before blending.
Placing: Once the cup is half to three quarters full, lower the jug and place the spout in the centre of the cup and pour fast. This nose-dive of the jug will ensure the froth comes out and forms a round shape (often known as Monk’s Head) in the centre of the cup. Make sure the spout of the jug is straight and swivel if the froth doesn’t come out.
Pushing: During placing, you can move your jug forward to push the monk’s head towards the back of the cup. A slight tilt to the cup and nose-diving the jug further will help with pushing. This technique is useful when pouring rosetta or tulip.

Stacking: After creating the first Monk’s Head, use the pushing technique to add a second one, keeping a gap in between. This second Monk’s Head will push the first one creating a curve. Repeat multiple times to create a stack which can be used for a tulip, stacked love heart, inversion swan, and a few other designs.
Swaying: Swivel the jug from side to side in a constant motion while keeping the spout close to the surface. For this technique, move your wrist and not your arm. Keeping the spout in the centre while swaying will give you a wavy Monk’s Head while pulling back gives you a rosetta. Swaying requires a lot of practice which can be done just using an empty jug.
Dragging: This technique is used for drawing lines on a design. The best example of dragging is the neck on a swan. This is usually done towards the end of a pour as the remaining froth makes it easier to drag. You will need to pour low and slow continuously to get the best result.
Cut through: This technique is used for finishing latte art where you lift the jug slowly and swipe the jug in an upwards motion. This will cut through the design in a straight line giving you the final shape. If the jug isn’t high enough, it can create a dragging effect.

BeanScene is now on LinkedIn! Follow HERE to stay up to date on all things coffee.